Printers Documentation
Complete guide to configuring printers to pair with Flip POS, and automated printing workflows for seamless food and beverage service operations.
Overview
- Epson Server Direct Print integration available now!
- Star Micronics integration coming soon!
- Multiple Printers can be configured to support your opertation
- Printer Routing to send products to the printer of your choice
Recommended Printer Models
Epson Printers with Server Print Direct
- OmniLink TM-T88VII
- OmniLink TM-m50II-H
- OmniLink TM-m50II
- OmniLink TM-m30III
- TM-T88V-DT
- TM-T88V-i
- TM-T70II-DT
- TM-T70-i
- TM-H6000IV-DT
- TM-T82II-i
- TM-L90-i
Printer Setup
Setting up printers with Flip POS is straightforward and easy to configure
Flip POS Printer Setup
- Go to Shopify Admin
- Navigate to Apps > Flip POS
- Open Settings > Printers
- Click "Add Printer"
- Enter Printer Name
- Select a Service Location (your Shopify POS locations)
- Click "Create Printer"
Epson Printer Configuration
- When you power on your printer, it should print a receipt displaying its LAN IP address. Enter this IP address into your web browser to access the printer’s settings page. For example: http://192.168.1.172 (replace with your printer’s actual IP address).
- Click Adcvanced Settings
- Click Administrator Login
- Enter Printer Serial Number as the password
- Click TM-i settings
- Click Server Direct Print
- Enable Server Direct Print
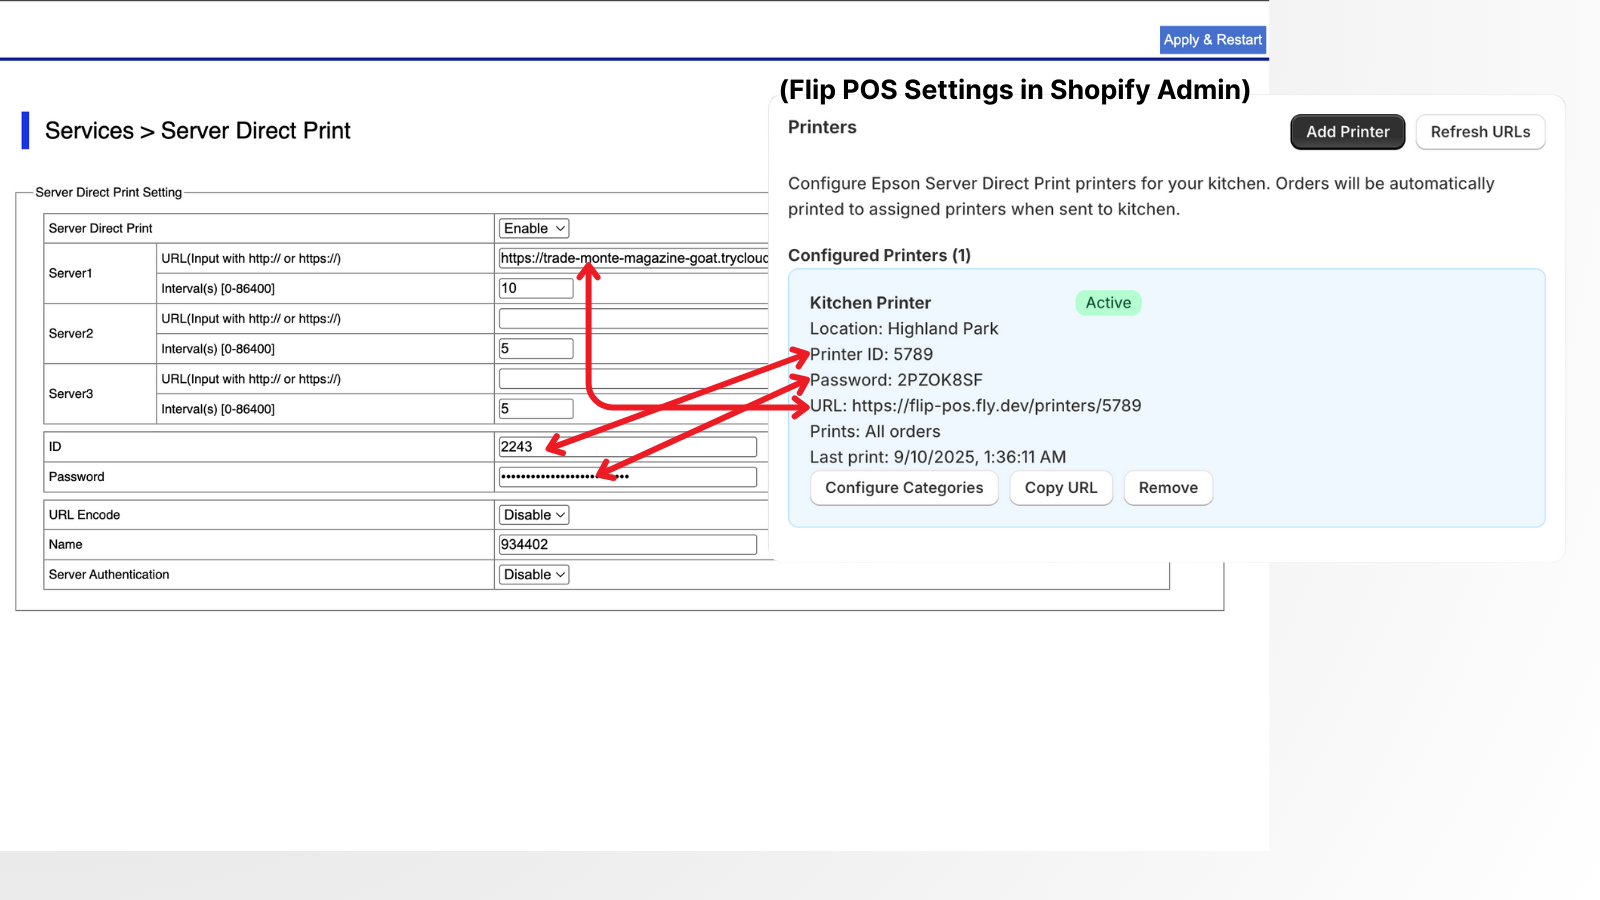
- Configure your settings according to the screenshot below
- Click Apply and Restart
- Click Ok
Kitchen Printing
Optimize kitchen workflows with intelligent ticket printing and routing.
Kitchen Ticket Content
Kitchen tickets include:
- Order number and table information
- Order time
- Menu items with quantities
- Modifiers and notes
Automatic Printing
Flip POS is setup to automatically print orders when they are sent to the kitchen or to the POS cart. If you do not have printers configured in the Settings page, no printing will occur.
Print Triggers
Printers will automatically print when the following occurs in Flip POS:
- Table Service: When the "send" icon is clicked on a table's check.
- Quick Serve: When you click "Send to POS Cart" on an order
Troubleshooting
Common printer issues and their solutions.
Printer Not Responding
- Check Power: Ensure printer is powered on
- Verify Connection: Check USB, network, or Bluetooth connection
- Restart Printer: Power cycle the printer
- Check Paper: Ensure paper is loaded correctly
- Test Network: Ping network printers to verify connectivity
Getting Support
When you need additional help:
- Contact support at
support@flip-pos.com - Include printer model and error messages
- Describe steps taken to resolve the issue
- Request remote assistance for complex issues